Lutron Caseta - 5 stars
I installed my first "smart" switch in 2010. It was a Leviton Z-Wave switch. Back then, getting automated "smart home" stuff was expensive, hard, and complicated. I was forced to do this as a result of some wacky wiring in my kitchen that required I have a smart keypad that can turn two lights on at once. The Leviton Viza RF+ products did the job for a number of years. But programming Z-Wave products stinks and interoperability is not perfect.
However, there has been a significant lighting change that required that I revisit much of my lighting: LED Light Bulbs. Lighting is the #1 consumer of energy in my home. We have over a hundred recessed lights in our home. Each room has 6-10 Par 30LN or Par38 bulbs each consuming 50W-90W of energy. Our kitchen and family room alone is about 1000W of energy for 10 hours per day. In a year that's about 3000Kw of energy, roughly 15% of all my electrical usage or $400 a year. To light one room! I have been motivated to cut this down with LED bulbs to roughly 210w (vs 1000w) or $100 a year. Since LED bulbs last 10-20 years, that's an incredible savings.
My quest for high quality replacement LEDs throughout the house meant all new dimmers. LEDs don't usually work with traditional dimmers and especially not my Leviton Z-Wave dimmers.
Around this time, Lutron had announced their Caseta "home" products. Lutron is an old name in custom lighting and makes most of the commercial and high end products in the market. They are all branded and packaged differently, but customer builders will use products like Radio RA2 and HomeWorks (for new construction). In fact, the way that new homes are getting wired resembles nothing like how current homes are wired. Lutron HomeWorks allows you to discretely control each load in the house through a central control panel. 120V is run to every light and Cat5 cable is run to each switch or dimmer as a "home run" back to the electrical panels. From there the nonsense of multi-way lighting (3, 4, 5 way) is eliminated along with all the head scratching ways of doing the wiring. It also means a lot less copper 14 gauge wire running all over the place.
For me though, I went with the do-it-yourself Caseta system. Most of the components can be purchased from Amazon and the entire system is HomeKit compatible, meaning you can say "Siri turn off the Main Floor" and she will turn off all the lights on the main floor. Other neat thing I can do, are dim the lights to 60% when the TV remote is used to turn on the TV. I can also use IFTTT recipes to trigger other remote actions. Siri is really powerful here with lots of easy to use commands. You can even dim lights for movie night or guests.
So how do you get started?
- You need enough electrical knowledge to replace dimmers and switches, including finding the neutral wire and connect that to some of the switches.
- You need to have a basic understanding of 3-way circuits although you will not be using them as Lutron accomplishes 3-way by using small little remotes that run off batteries that replace your old 3-way switch.
- A Lutron Smart Bridge
- Some Lutron Dimmers, Switches and Remotes
Lutron SmartBridge
The Lutron SmartBridge (HomeKit Version) can be purchased stand-alone or as part of a kit. I would go with the kit since you are getting a dimmer and remote for a $20 difference.

The SmartBridge is a small little box that you plug into your ethernet, and then add to your HomeKit network. In fact it doesn't need HomeKit at all and Lutron has a standalone iOS app that you can use to control the system. Lutron also supports a number of 3rd party products such as Logitech Harmony remote but sadly not Amazon Echo!
For $20 more you can get the SmartBridge with Dimmer and Remote as a bundle. Normally the dimmer with remote is $60.
It's important to note that the Lutron SmartBridge will only accept 50 devices (including remotes). So if you are doing your whole house and have greater than 30 loads (assuming you will want 20 remotes) you might be out of luck and will need to go up a level with the Radio RA2 - but this now gets you into custom installer stuff which I wanted to avoid. It's a ridiculous limitation which I imagine its there to protect their custom installer market.

The SmartBridge with a 600W Dimmer and Pico remote.
Lutron Dimmers
There are two kinds of dimmers. The standard dimmer which will handle a 150W LED / 600W Incandescent load or a "Pro" version that will handle 250W LED / 1000W Incandescent load.
It's critical that you replace an existing 1000W dimmer with 1000W dimmer. Why is this important? Say you have ten 90W bulbs powered by a single dimmer. That's 900W of power. If you used a 600W dimmer it would eventually fail as it cannot handle the resistance of that much power. Rule of thumb, if you have 8 recessed cans or more on a given dimmer get the 1000W Pro. In fact, the Pro is such a better dimmer than the non-pro, and the cost difference nominal that I have purchased all my dimmers as "Pro". When you are replacing a dimmer your existing dimmer will probably have a marking on it indicating if it's 600w or 1000w.
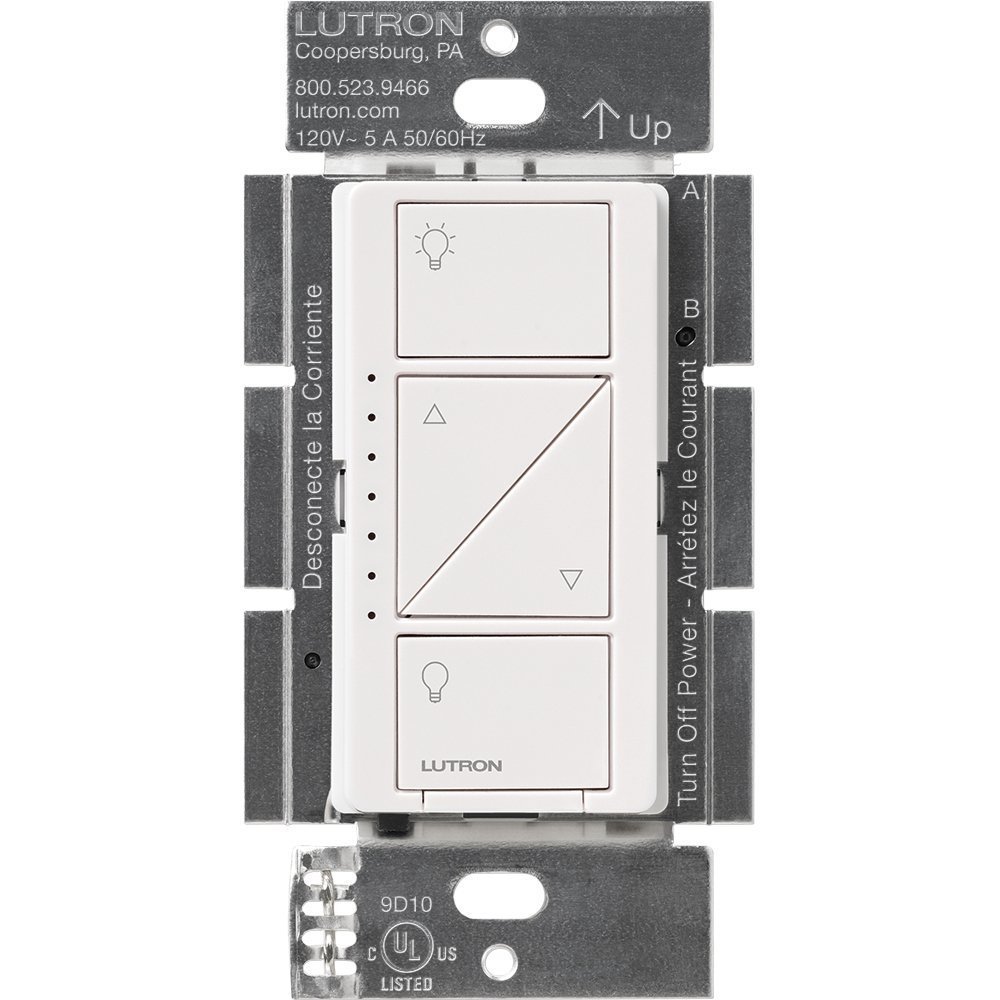
Here is the "Pro" 1000w Dimmer
An important difference, besides load, as discussed above, is the following.
The Pro dimmer:
- Can be used with mechanical 3 way switches (with a small change in wiring). This means you can keep your existing wiring in use with a 3 way but not 4 way.
- Requires a neutral wire to work
- Provides a cleaner less noisy operation (due to the neutral wire) when dimming.
A critically important document to consult is the Caseta Advanced Programming Guide. This is an excellent well written guide that details how to do any more complex wiring install vs just replacing a single load dimmer/switch.
My biggest complaint with these dimmers is that you cannot pre-program a favorite dim level on the dimmer. You can with the Pico remotes though.
If you have a neutral wire that you can use, go with the Pro Dimmer. It's a much better product.
Lutron Switches
Switches by their nature are simpler products than dimmers. They are just a pass through. However, there are a few problems with switches and LED loads. They often need a minimum load to function and many LED setups do not support that minimum load. For example, I have a switch with 2 LED bulbs on it (10w each) and the Switch will not work unless you get the model with the neutral wire, or the regular switch with these funny minimum load wires.
It's best if you just stick with the new Lutron Switch that has a neutral wire and works 100% of the time. The product to get in this case is the Lutron PD-6ANS-WH Caseta Wireless Multi-Location In-Wall Neutral Switch, 6 Amp. If you don't have a neutral available or don't have a small load problem, try the Lutron PD-5S-DV-WH.
I have used both, in different applications and they both work great. The PD-6ANS-WH is newer and was not available when I first started this product. It can be a pain to mess with a neutral wire if you have older construction, but it's best IMHO to always wire a neutral to these smart switches.
Lutron Remotes
This is where it gets fun and where Lutron has really done an incredible job. The remotes are the brains of the system. Once you have your dimmers and switches installed you can purchase remotes and either place them by your bedside table, or also put them into the wall replacing existing 3-way switches (which become unnecessary any more) or add them as new switches by getting a larger gang plate cover (so if you have 2 switches in a gang box you can add another 3rd pick remote by wall mounting it).
The Pico remotes work with lots of different Lutron systems, which is great. In fact a lot of the Lutron products share their DNA with the entire line providing for flexibility, compatibility and ease of purchase.
I have purchased 3 types of remotes. 2 of them are easy to get from Amazon, and one is a lot harder to find (the 4 button remote).
Lutron PJ2-3BRL-GWH-L01 Maestro Wireless Pico Remote Control

This also comes with a mounting kit (wall bracket and screws, with face plate). It's also the most commonly found remote. You can pair a Pico remote (through the Lutron app) to any number of dimmers and switches. This allows you to have multi load control (or multi way control for a single switch). The system is infinitely flexible. The big round button in the middle is the favorite button. Once you have selected a pre-set dim or on/off setting you can press and hold the button and program it. Besides that the remote offers on/off and dim.

This remote is a simple on/off function. Like the other remotes you can pair with a number of different loads or simply extend a single load to 3 or 4-way.
Lutron-PJ2-4B-GWH-L31ico Wireless Control with indicator LED, RF signal, 4-Button Scene Control
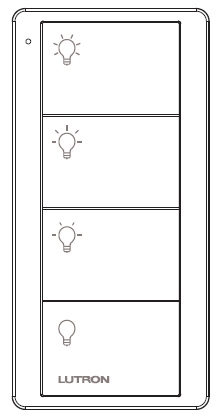
This remote is harder to find, and offers 3 different scene controls and one off. The top 3 buttons can be controlled for different dim levels or on off states for multiple loads. I use this a lot to control on/off for a series of switches in my staircase, hallway, and up-stairs landing. That way the top button can be "going upstairs" and the 2nd button can be "hallway only" and so on. A remote is paired to a set of loads and to program state you simply set them all up how you want and then press and hold a button to program it. Pairing is achieved via their app.
Mounting
There are a few mounting options for every remote. Each one is powered off a "watch battery" and should last 10 years.
Stick mount
Each remote has a built in plastic mount with adhesive tape. You can stick it anywhere. I have two of them stuck to my nightstand and my wife's nightstand allowing us to turn on/off and dim our bedroom lights.
Pedestal Mount
The Pedestal Mount comes in 3 sizes and allows you to mount a series of remotes. This can come in handy if you say have table lamps and ceiling lights and want discrete control over all of them.
Wall Mount
The Lutron PICO-WBX-ADAPT mount goes into a gang box taking up one space. It's convenient for converting a 3 or 4-way system to be controlled by Lutron. You basically take all the wires (hot, traveler) and screw them together, then screw in the mount and insert the remote.
You can also screw the mount into your sheet rock creating an extension for any wall plate you have. For example, if you have a 2 gang box and want to add a 3rd virtual switch you can do that by screwing in a wall mount and buying a larger gang plate. Once installed no one will know if the switches are controlling a load or powered by a Lutron Pico.

Visor Mount
The Lutron PICO-CAR-CLIP lets you keep a remote in your car. You could pair the remote with any set of lights in your house and have easy control when leaving or arriving. I personally just use Siri or the Lutron app with Geo fencing to turn scenes on or off when leaving home.

Lutron App & Siri
Now that you have a sense for all the hardware options that make up the Lutron Caseta system, the rest of the system is the software. There is a Lutron app for iOS that lets you program, control, and of course use Siri to control everything.
You have to take care to name things in a way that makes sense. This took me a while. The reason being is that you'll want to create "Rooms" and "Scenes" as well as "Zones" - think "Floors" using a HomeKit app. This lets you group lights in a room or a floor together and say things like "Turn off Upstairs" and have that turn off everything upstairs. Names must be unique such as Master Bedroom Lights and Master Bedroom to refer to the HomeKit room.

HomeKit
HomeKit is one of the best things that's happened in the home automation world. Siri and even Alexa are the best and most natural interfaces to smart home control. However, it's early days for HomeKit. There are a number of bugs and the system is complex at times, and app support is not complete. The Lutron app has "scenes" but they are not HomeKIt scenes. To really control and program HomeKit there is a must have app called Home that you must buy.
I used the Home app to customize my setup for Siri. Below you can see a list of all my "Rooms" and what products are in each.
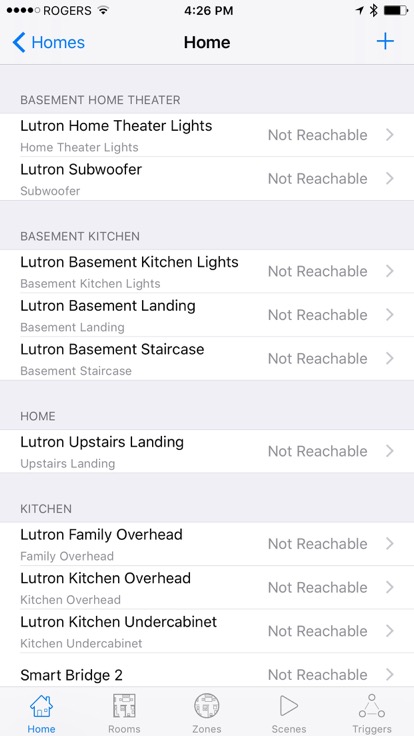
Below are the rooms

And then my zones

Summary
There is a lot you can do, and there are more HomeKit accessories arriving. I think Amazon and Apple are building the best ecosystems around home control for lights, doors, locks, security, shades, thermostats. Lutron has, in my opinion the best lighting control and works without HomeKit.
I also still have and use a Wink, which I'll also review. The Wink is also great, but doesn't work with all the Lutron products, and still doesn't support HomeKit limiting voice integration with your iOS products (although it does work with Amazon Echo). I'm mainly using my Wink to control outside lights, garage door and other timed lights.
I suspect that Lutron will continue to bring more of their products down from their higher end custom installer lines. They could really use occupancy sensors, a plug in module for switched loads, as well as more remote options. Their switch and dimmer compatibility is great and it's an easy product to install, with great instructions and 24/7 customer support. The best part is that they work stand-alone or through an easy to configure iOS app, something that cannot be said for competing lighting control products.
The entire Lutron Caseta line is 5 stars.
★★★★★
Exceptional. A spectacular product.